Criando Aplicativos Mobile com React Native
Este artigo é um pontapé inicial no desenvolvimento de aplicativos mobile (Android e iOS) com React Native. Vamos abordar a configuração do ambiente de desenvolvimento e o deploy de um "Hello World" em teu celular Android.
[ Hits: 8.051 ]
Por: Fábio Berbert de Paula em 10/04/2020 | Blog: https://fabio.automatizando.dev

Criando o primeiro projeto
Com o terminal aberto, digite:
react-native init VivaOLinux
Acho que dá tempo de ir tomar um cafezinho, o cliente irá baixar uma penca de arquivos da internet...
Será criada uma pasta chamada "VivaOLinux". Você obviamente irá colocar o nome de seu projeto ao invés de VivaOLinux no comando acima.
cd VivaOLinux
ls
android
App.js
app.json
babel.config.js
index.js
ios
metro.config.js
node_modules
package.json
package-lock.json
__tests__
E tcharam!!! Temos um projeto React Native! O arquivo inicial é o "index.js", que por sua vez aponta para "App.js". Em artigos futuros falaremos mais sobre eles.
Agora queremos executar esse projeto em um dispositivo Android. É possível fazer isso criando um emulador Android no Studio ou conectando nosso celular ao PC. Eu particularmente prefiro conectar o celular, é bem mais rápido que o emulador, acreditem! Para isso utilizaremos a ferramenta adb (Android Debug Bridge).
Execute no terminal:
adb devices
List of devices attached
Por enquanto não temos dispositivos conectados. Então faça o seguinte, conecte teu celular ao PC usando o cabo USB e tente novamente:
adb devices
List of devices attached
192.168.1.108:5555	device
NOTA: estou supondo que você já habilitou depuração USB em opções do desenvolvedor no teu Android. Se nunca fez isso, dê um pulinho no Google e pesquise sobre o assunto. É molezinha! Qualquer coisa pergunte nos comentários aqui. E claro, o nome do teu dispositivo não será 192.168..5555.
Com o dispositivo conectado, vamos iniciar o "metro server", que servirá para depuração e atualização em tempo real de nosso aplicativo em desenvolvimento.
No diretório do projeto execute:
react-native start
###### ######
### #### #### ###
## ### ### ##
## #### ##
## #### ##
## ## ## ##
## ### ### ##
## ######################## ##
###### ### ### ######
### ## ## ## ## ###
### ## ### #### ### ## ###
## #### ######## #### ##
## ### ########## ### ##
## #### ######## #### ##
### ## ### #### ### ## ###
### ## ## ## ## ###
###### ### ### ######
## ######################## ##
## ### ### ##
## ## ## ##
## #### ##
## #### ##
## ### ### ##
### #### #### ###
###### ######
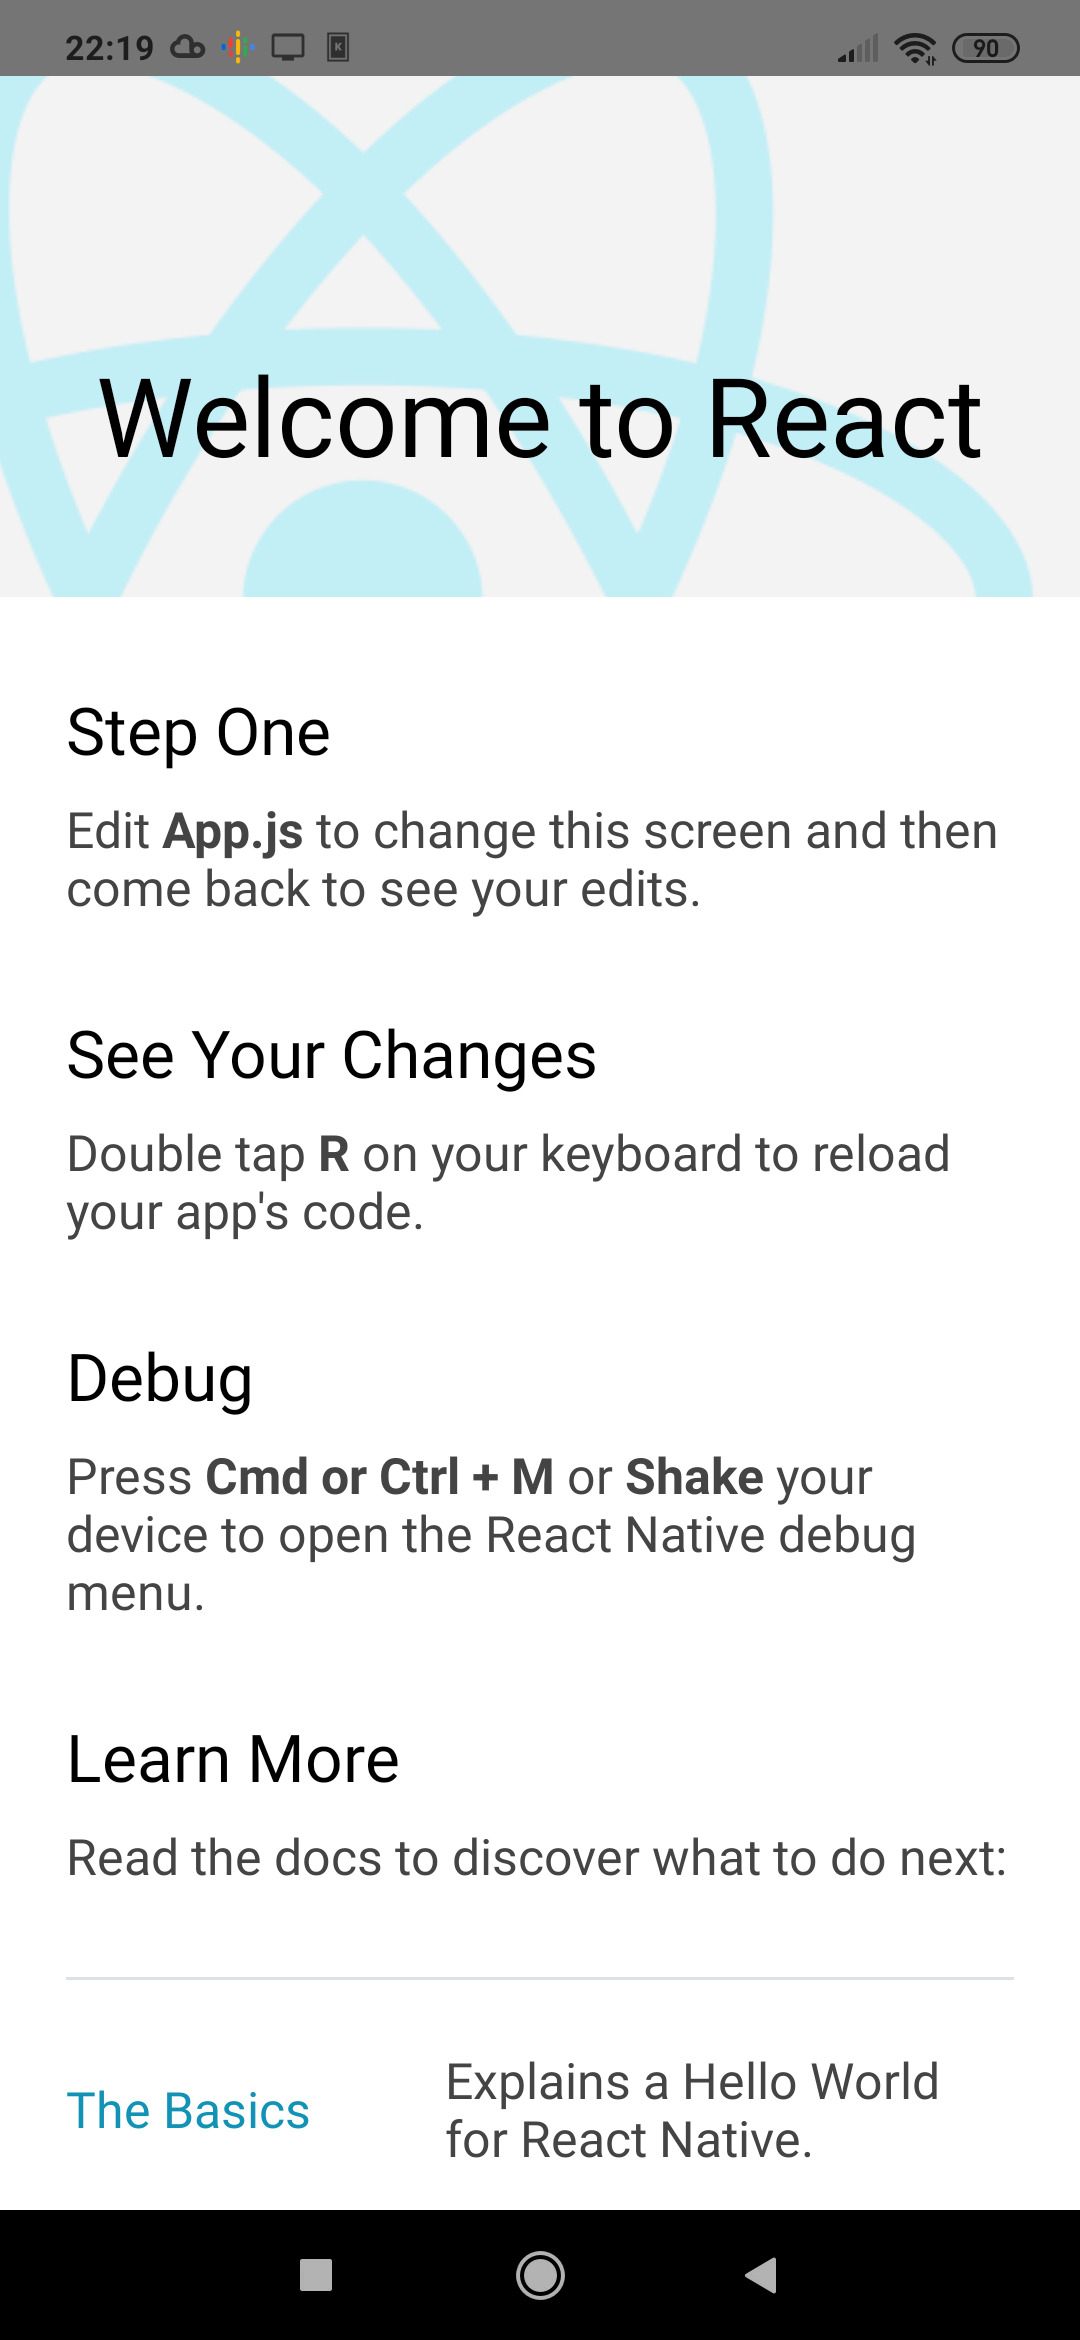
Welcome to React Native!
Learn once, write anywhere
To reload the app press "r"
To open developer menu press "d"
O terminal ficará preso. Precisaremos abrir outro terminal na pasta do projeto...
Já fez? Ótimo! Então agora vamos executar o projeto no celular:
react-native run-android
Fique ligado que na primeira execução o teu celular irá perguntar se você deseja instalar o aplicativo no aparelho, responda que sim. Vai demorar um pouquinho, mas o resultado final será o aplicativo na tela do teu mobile:
/**
 * Sample React Native App
 * https://github.com/facebook/react-native
 *
 * @format
 * @flow strict-local
 */

import React from 'react';
import {
  SafeAreaView,
  StyleSheet,
  ScrollView,
  View,
  Text,
  StatusBar,
} from 'react-native';

import {
  Header,
  LearnMoreLinks,
  Colors,
  DebugInstructions,
  ReloadInstructions,
} from 'react-native/Libraries/NewAppScreen';

const App: () => React$Node = () => {
  return (
    <>
      <StatusBar barStyle="dark-content" />
      <SafeAreaView>
        <ScrollView
          contentInsetAdjustmentBehavior="automatic"
          style={styles.scrollView}>
          <Header />
          {global.HermesInternal == null ? null : (
            <View style={styles.engine}>
              <Text style={styles.footer}>Engine: Hermes</Text>
            </View>
          )}
          <View style={styles.body}>
            <View style={styles.sectionContainer}>
              <Text style={styles.sectionTitle}>Step One</Text>
              <Text style={styles.sectionDescription}>
                Edit <Text style={styles.highlight}>App.js</Text> to change this
                screen and then come back to see your edits.
              </Text>
            </View>
            <View style={styles.sectionContainer}>
              <Text style={styles.sectionTitle}>See Your Changes</Text>
              <Text style={styles.sectionDescription}>
                <ReloadInstructions />
              </Text>
            </View>
            <View style={styles.sectionContainer}>
              <Text style={styles.sectionTitle}>Debug</Text>
              <Text style={styles.sectionDescription}>
                <DebugInstructions />
              </Text>
            </View>
            <View style={styles.sectionContainer}>
              <Text style={styles.sectionTitle}>Learn More</Text>
              <Text style={styles.sectionDescription}>
                Read the docs to discover what to do next:
              </Text>
            </View>
            <LearnMoreLinks />
          </View>
        </ScrollView>
      </SafeAreaView>
    </>
  );
};

const styles = StyleSheet.create({
  scrollView: {
    backgroundColor: Colors.lighter,
  },
  engine: {
    position: 'absolute',
    right: 0,
  },
  body: {
    backgroundColor: Colors.white,
  },
  sectionContainer: {
    marginTop: 32,
    paddingHorizontal: 24,
  },
  sectionTitle: {
    fontSize: 24,
    fontWeight: '600',
    color: Colors.black,
  },
  sectionDescription: {
    marginTop: 8,
    fontSize: 18,
    fontWeight: '400',
    color: Colors.dark,
  },
  highlight: {
    fontWeight: '700',
  },
  footer: {
    color: Colors.dark,
    fontSize: 12,
    fontWeight: '600',
    padding: 4,
    paddingRight: 12,
    textAlign: 'right',
  },
});

export default App;
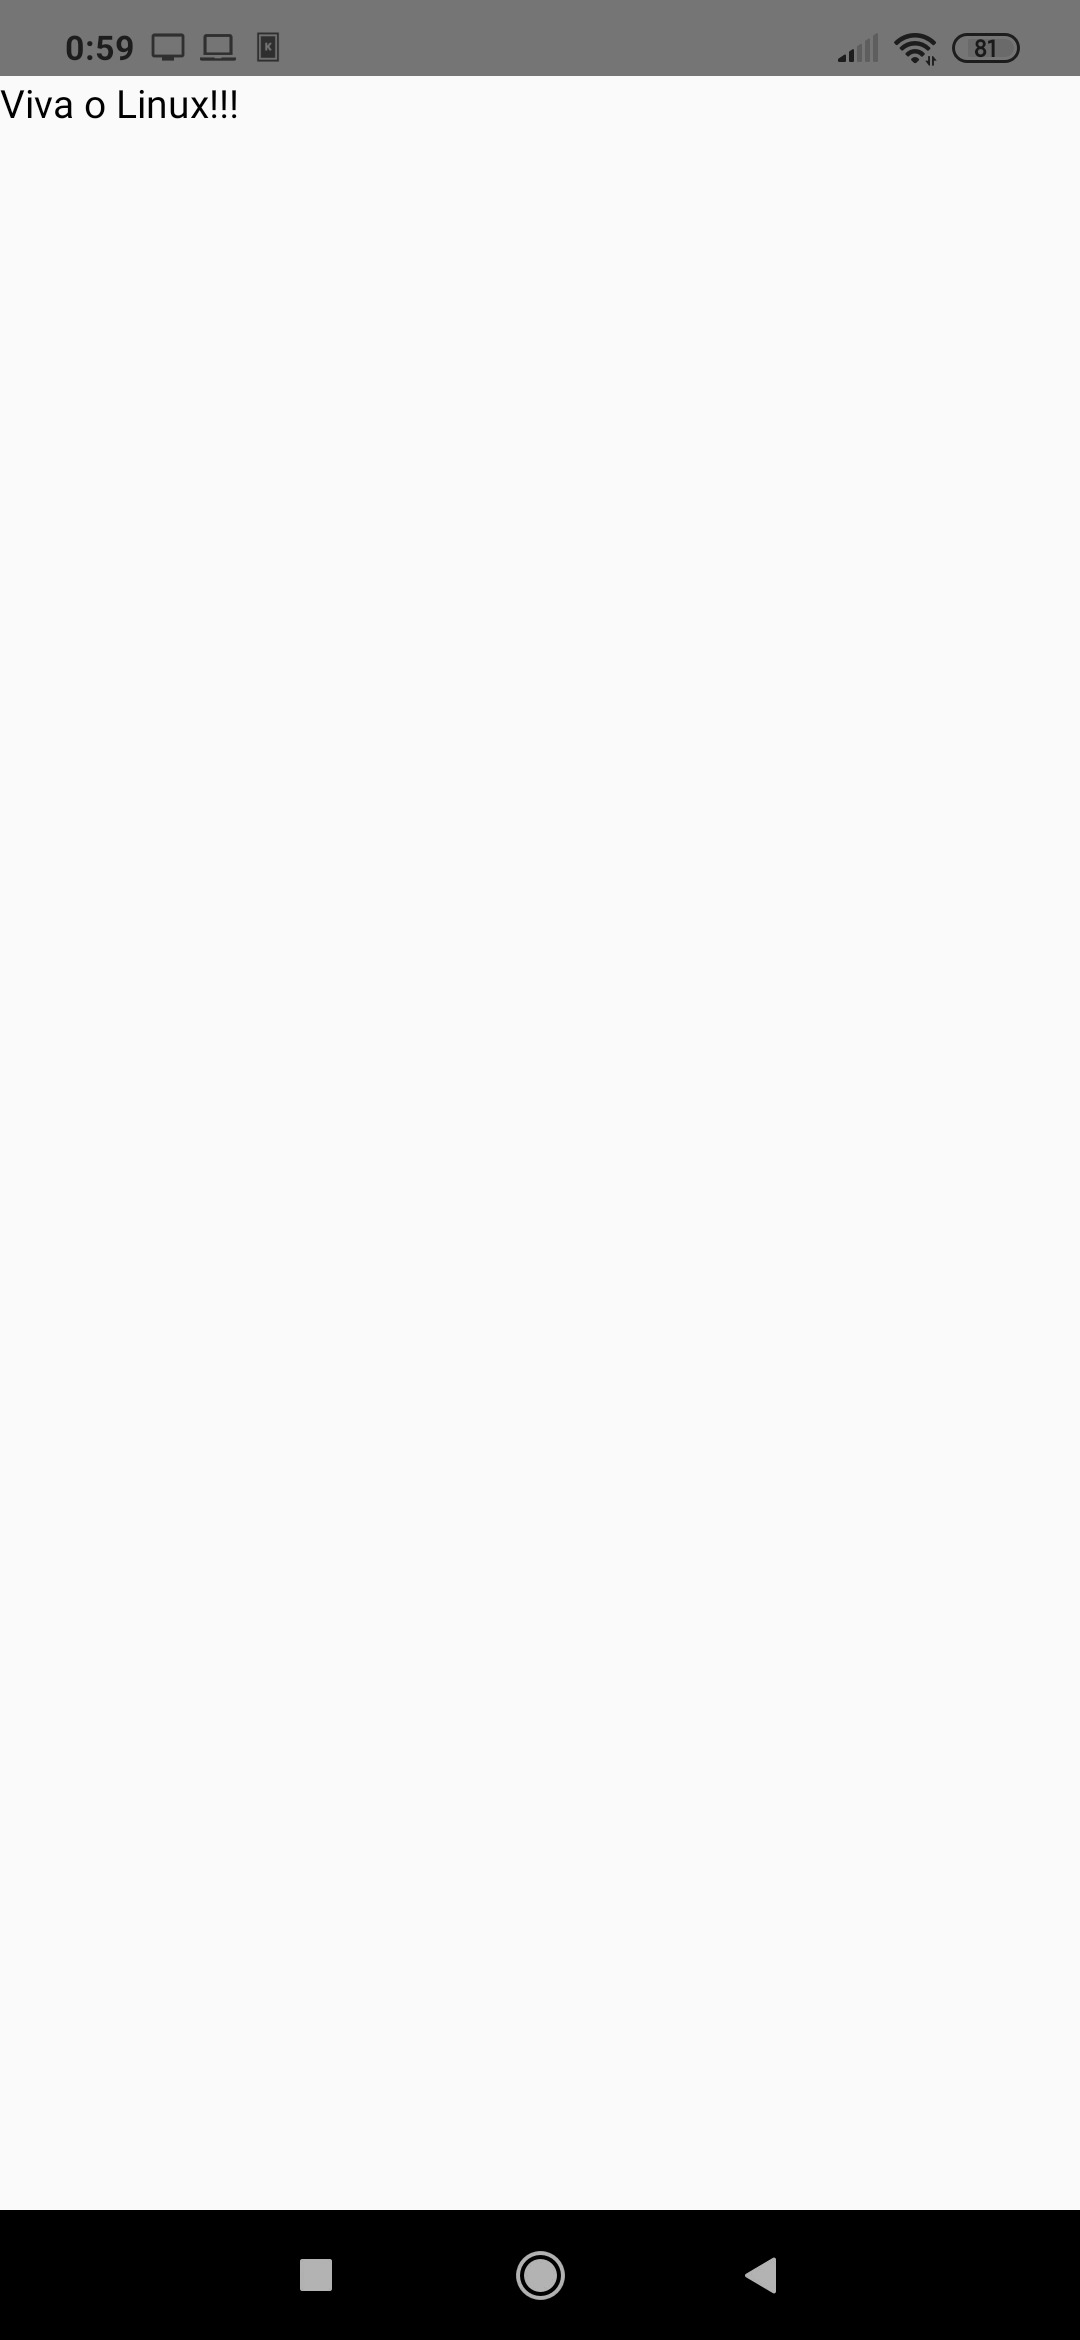
Vamos alterá-lo? Exclua seu conteúdo e substitua por:
import React, { Component } from 'react'
import { Text } from 'react-native'

export default class App extends Component {
   render() {
      return (
         <Text>Viva o Linux!!!</Text>
      )
   }
}
Note que o aplicativo já mudou de cara automaticamente no teu celular. A mágica é obtida por conta do Metro Server, que está rodando num terminal na pasta do projeto com o comando "react-native start", lembra?
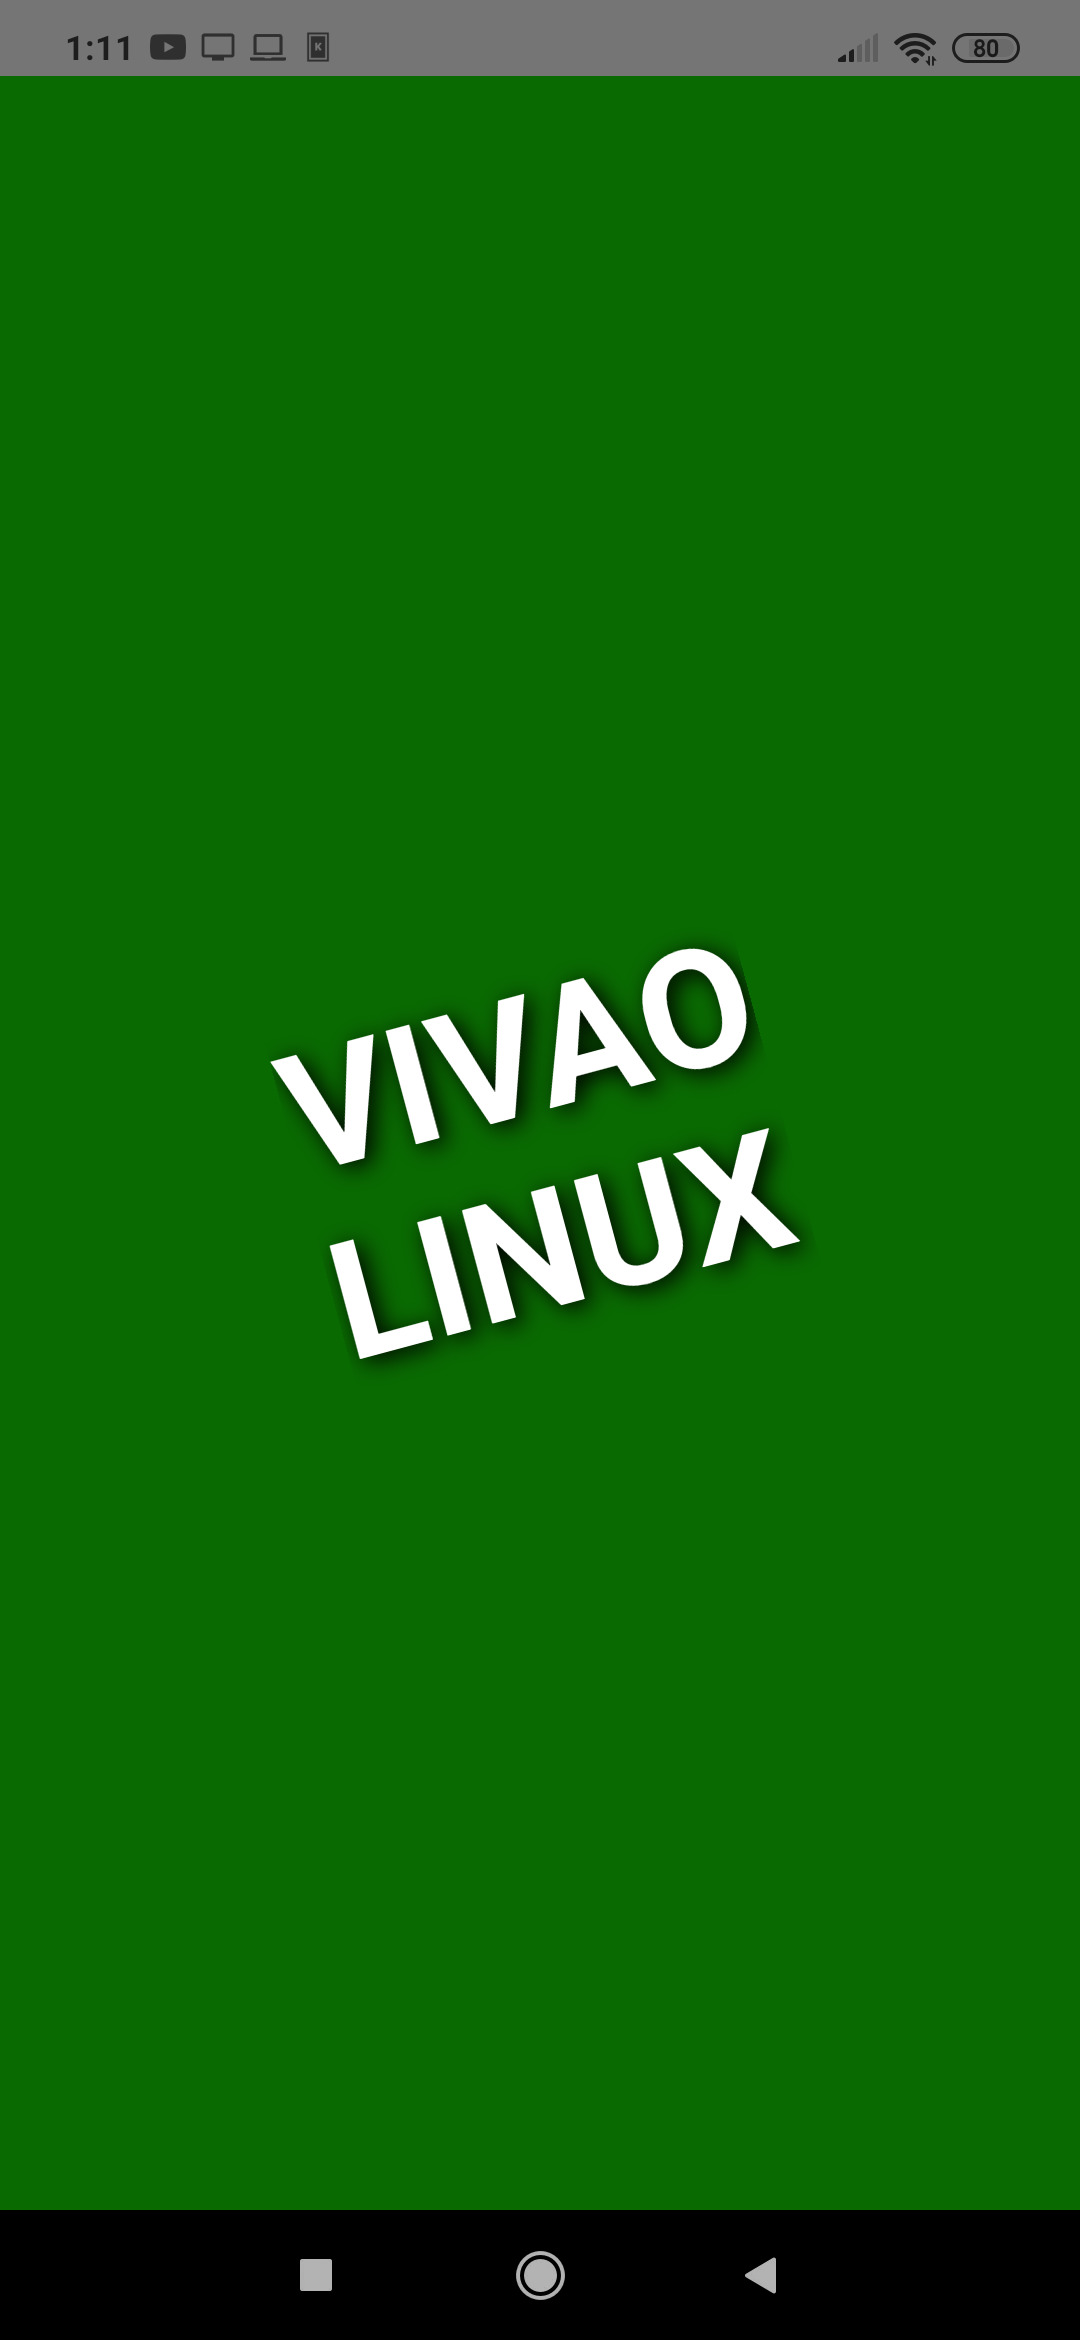
import React, { Component } from 'react'
import { StyleSheet, View, Text } from 'react-native'

export default class App extends Component {
   render() {
      return (
         <View style={styles.view}>
            <Text style={styles.text}>Vivao{'\n'}Linux</Text>
         </View>
      )
   }
}

const styles = StyleSheet.create({
   view: {
      flex: 1,
      alignItems: 'center',
      justifyContent: 'center',
      backgroundColor: '#096A01',
   },
   text: {
      color: '#ffffff',
      fontSize: 60,
      fontWeight: 'bold',
      textTransform: 'uppercase',
      textShadowColor: '#000000',
      textShadowRadius: 20,
      textShadowOffset: {width: 2, height: 2},
      transform: [{ rotate: '-15deg'}]
   }
})
2. Android Studio
3. Criando o primeiro projeto
Novidades Linux: Kernel 6.17, distros em ebulição e segurança em foco
Diversão e Entretenimento no Linux
Kdenlive - Como desfocar/borrar rosto, área ou objetos em um vídeo
IA chega ao desktop e impulsiona produtividade no mundo Linux
Ativando o Modo Noturno via Linha de Comando no GNOME/Wayland
Google AdSense: Técnicas de otimização dos anúncios
JavaScript - Programação orientada a objetos
Listar dados em MySQL utilizando PHP e AJAX (parte 1)
ExtJS: Um excelente framework de JavaScript
Nenhum comentário foi encontrado.
Patrocínio

Destaques
Artigos
A produção de áudio e vídeo no Linux e as distribuições dedicadas a esse fim
Criptografando sua Home com Gocryptfs para tristeza do meliante
A Involução do Linux e as Lambanças Desnecessárias desde o seu Lançamento
O Journal no Linux para a guarda e consulta de logs do sistema
A evolução do Linux e as mudanças que se fazem necessárias desde o seu lançamento
Dicas
Instalar Ubuntu com Btrfs + LUKS de forma fácil
Habilitando "hotcorner" no Ubuntu
Zen Kernel no Arch Linux (instalar e remover)
Como instalar e remover o kernel Liquorix
Fazendo o controle de Xbox 360 USB funcionar no One Piece Pirate Warriors 4 (Arch Linux/Steam)
Tópicos
Continuando meus tópicos anteriores (9)
Executar um programa em Rust (2)
Não consigo publicar screenshots no Viva o Linux [RESOLVIDO] (5)
Top 10 do mês
-

Xerxes
1° lugar - 154.698 pts -

Fábio Berbert de Paula
2° lugar - 79.829 pts -

Buckminster
3° lugar - 44.819 pts -

Alberto Federman Neto.
4° lugar - 44.993 pts -

Alessandro de Oliveira Faria (A.K.A. CABELO)
5° lugar - 36.535 pts -

edps
6° lugar - 32.868 pts -

Sidnei Serra
7° lugar - 26.117 pts -

Mauricio Ferrari (LinuxProativo)
8° lugar - 25.601 pts -

Daniel Lara Souza
9° lugar - 23.673 pts -

Andre (pinduvoz)
10° lugar - 22.448 pts
Scripts
A maior comunidade GNU/Linux da América Latina! Artigos, dicas, tutoriais, fórum, scripts e muito mais. Ideal para quem busca auto-ajuda.
Site hospedado por: